In order for the guest and the hotel to receive the confirmation of the booking, the system automatically sends an e-mail to both of them at the time the booking is made.
In the Witbooking Control Panel, go to Communication > Email confirmation.
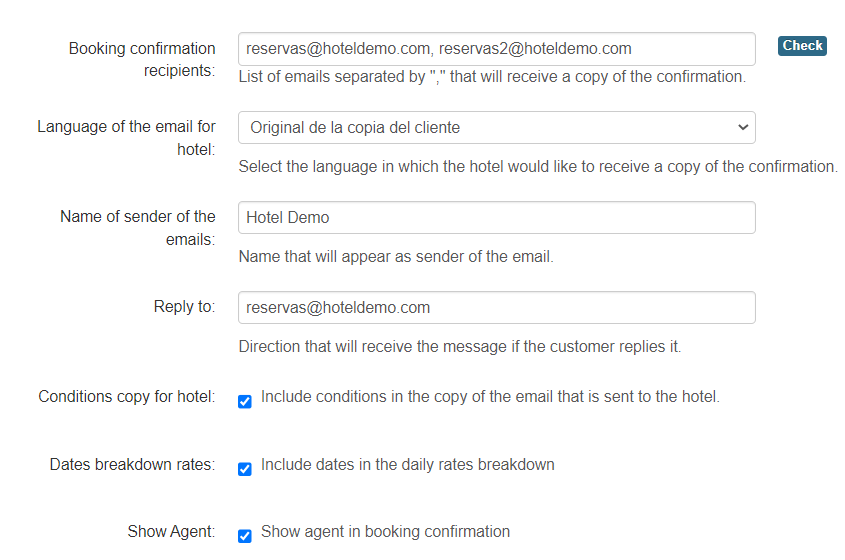
The main fields of this interface are detailed below:
Booking confirmation receiver: list of addresses that will receive a copy of the booking confirmation. You can assign as many email addresses as you wish, separated by commas. Example: reservas@email.com, reservas2@email.com
Mail language for the hotel: language in which the hotel will receive the confirmation copy. It is possible to select a general language for all customers or to select the language in which the customer makes the reservation.To do this, select “Customer’s original copy”.
Name of the sender of the emails: name that will appear as the sender of the emails.
Reply to: in the event that the customer chooses to reply to the confirmation email, a reply will be sent to the address indicated in this field. The sender of the booking confirmation email is no-reply@email.com by default. In order to determine a personalised sender address, follow the steps in the following manual: How to configure an email account as the sender of automatic emails.
The confirmation email includes the booking details and allows you to customise the header, footer and logo. In order to do this, you must enable the “Custom header and footer” checkbox in the Customise header/footer section.
Logo: activate the Logo checkbox in the Customise header/footer section.
Header: enter text that will appear before the booking voucher. E.g: Dear XXXX, With this email we would like to confirm your booking.
Footer: enter the final text that will appear after the booking voucher. E.g: For any further information please contact us by email: reservas@hoteldemo.com or by phone: 930013880. Yours sincerely,
In addition, customised fields can be added, which will be replaced by customer or booking data. These are detailed below:
Customer name: to personalise the email according to the name of the customer who has made the booking, the text {customer_name} must be included. By doing this, the system will automatically include the name of the customer who’s made the reservation in the email. E.g: Dear {customer_name}.
Start and end dates of stay: in order to configure that the start and end dates of stay appear automatically, you must include the text {startDateBooking} for the start and {endDateBooking} for the end of the stay. E.g: We wish you a pleasant stay from {startDateBooking} to {endDateBooking} in our Hotel.

Finally, select Save to make the changes correctly.
Was this article helpful?
That’s Great!
Thank you for your feedback
Sorry! We couldn't be helpful
Thank you for your feedback
Feedback sent
We appreciate your effort and will try to fix the article